Thursday, 25 January 2024

7 Steps of Gel Electrophoresis

Gel electrophoresis is a fundamental technique in molecular biology, widely used for separating and analyzing DNA, RNA, and proteins based on their size and charge. This powerful method enables researchers to gain valuable insights into genetic information, investigate mutations, and perform various diagnostic and analytical applications. In this blog, we will explore the seven essential steps of gel electrophoresis, providing a comprehensive guide for both beginners and experienced scientists.

Step 1: Preparation of Agarose Gel

The journey begins with the preparation of the gel matrix. Agarose, a polysaccharide derived from seaweed, is commonly used to create a porous gel. The concentration of agarose can be adjusted based on the size range of the molecules you are working with. Higher concentrations are suitable for smaller fragments, while lower concentrations are preferred for larger fragments.

Step 2: Melting and Casting the Gel

After measuring the appropriate amount of agarose, it is melted in a buffer solution and then cast into a gel mold. Comb-like structures are inserted to create wells for sample loading. Once the agarose solidifies, the gel is ready for the next phase.


Step 3: Preparing the DNA Samples

Before loading the samples onto the gel, DNA molecules are typically treated with a loading dye that provides density and allows for easy tracking during electrophoresis. The loading dye also contains a tracking dye to monitor the progress of the electrophoresis run.

Step 4: Loading the Gel

Carefully, the DNA samples mixed with loading dye are loaded into the wells of the agarose gel. A DNA ladder, consisting of known-sized fragments, is often included to estimate the sizes of the sample bands.

Step 5: Running the Electrophoresis

The gel is submerged in a buffer-filled electrophoresis chamber, and an electric current is applied. DNA, being negatively charged, migrates towards the positively charged electrode. Smaller fragments move faster through the gel matrix, resulting in separation based on size.

Step 6: Staining and Visualization

After electrophoresis, the separated DNA fragments are invisible. Staining agents, such as ethidium bromide or safer alternatives like SYBR Green, are used to make the DNA bands visible under UV light. Gel documentation systems or gel imagers capture the images for further analysis.

Step 7: Analysis and Interpretation

The final step involves analyzing the gel image. The distance traveled by each DNA fragment is compared to the ladder, enabling the determination of fragment sizes. Researchers can then draw conclusions about the composition and characteristics of the DNA or RNA samples.

Conclusion:

Gel electrophoresis is a versatile and indispensable tool in molecular biology, offering insights into genetic information and aiding various research and diagnostic applications. Mastering the seven steps of gel electrophoresis is crucial for obtaining reliable and reproducible results. Whether unraveling the mysteries of genetic disorders or exploring the intricacies of molecular biology, gel electrophoresis stands as a cornerstone technique in the scientific journey.
Friday, 12 January 2024

The Fundamentals You Need To Know About A Biosafety Cabinet


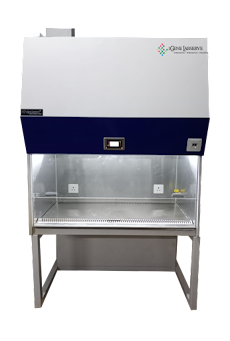
As it screens both the intake and exhaust air, a biological safety cabinet (BSC) is a fundamental engineering control that guards workers against infectious or biohazardous materials while also assisting in maintaining material quality control. It is also known as a culture vessel for tissue hood or laminar flow.

biosafety cabinet is primarily used to guard against exposure to particles or aerosols. Most BSCs use an exhaust HEPA filter to circulate some of the air back into the research facility. This removes animal dander, possibly infectious particles, or both from the air, but it does not lessen the exposure to chemicals.

What is the working principle of these cabinets?

The basic idea behind how biosafety cabinets operate is to draw air from within them so that they maintain a low-pressure environment and provide vertical airflow to safeguard personnel. To prevent contaminating the analyzed samples, external air undergoes filtering using an air filter (high-efficiency particulate air filter or HEPA filter) before entering the biosafety cabinet. To safeguard the environment, the air within the biological safety cabinet must also pass through a HEPA filter before being released into the atmosphere.

What is the function of these filter cabinets?

This section will explain the purpose of these biosafety cabinets once you have a firm understanding of their usage and philosophy. The safety cabinet's primary purpose is to shield the environment and the researcher from the negative pressure generated by the filtration fume hood that produces bioaerosols during the experiment. The primary piece of equipment for preventing laboratory-acquired infections is the biosafety cabinet class 2.

Types of biosafety cabinets

Depending on the biological safety protection, these biosafety cabinets can be divided into three types.

Let’s discuss them a bit to understand how those works.

Biosafety Cabinet Class I

Despite preserving samples, class I biosafety cabinets safeguard both the environment and employees. A typical kitchen in a research facility operates on an identical airflow basis. The filter attached to the emission port is what makes a difference.

The fan in the exterior vent pipe drives the airflow in the first-class biological safety cabinet as it lacks a fan of its own. It is currently seldom utilized since it cannot safeguard test objects or products.

Biosafety Cabinet Class II

Based on the input air velocity, emission mode, and circulation mode, the class II biological safety cabinet may be separated into four levels: Type A1, Type A2, Type B1, and Type B2. Products, personnel, and the environment are all protected in Class II biosafety cabinets.

Biosafety Cabinet Class III

Labs with a biological safety protection level of 4 are intended for use with Class III biosafety cabinets. There is no air leakage in the biosafety cabinet class ii type a2 specification. To guarantee there is no contamination, the test goods enter and leave the safety cabinet through the double-door transfer box, and the personnel works using gloves that are attached to the cabinet.

Biosafety cabinets classified as class III are appropriate for high-risk biological investigations, including those involving the SARS and Ebola viruses.

If you want to buy any of these biosafety cabinets for research purposes, look no further than iGene Labserve.

Go to our website (https://www.igenels.com/) to check our biosafety cabinet types. For enquiries, reach us at 18005720603 and info@igenels.com.

Monday, 8 January 2024

Maintenance and Validation of Laminar Air Flow Systems


Maintenance and validation of laminar air flow systems are important to ensure their proper functioning and to create a controlled and clean environment. Here are some guidelines for maintenance and validation:

  1. Regular Cleaning: The laminar air flow system should be cleaned regularly to remove any dust, debris, or other contaminants that may have accumulated. This includes cleaning the filtration system, vents, and other components.

  2. Filter Replacement: The filters in the laminar air flow system should be replaced as per the manufacturer's recommendation. This helps in maintaining the integrity of the clean air by preventing the circulation of particulate matter.

  3. Airflow Monitoring: Regular monitoring of the airflow velocity and direction is necessary to ensure that the system is functioning properly. This can be done using an anemometer or a similar instrument. Any deviations from the specified airflow parameters should be investigated and rectified.

  4. Validation Testing: Periodic validation testing of the laminar air flow system is crucial to ensure compliance with regulatory requirements and to verify the system's performance. This can be done through particle count testing, microbial sampling, or smoke testing.

  5. Calibration of Instruments: Any instruments used for monitoring, such as anemometers or particle counters, should be calibrated regularly to maintain accuracy. This ensures that the measurements are reliable and consistent.

  6. Record-Keeping: It is important to maintain thorough documentation of maintenance activities, filter replacements, validation tests, and calibration records. This helps in tracking the system's performance over time and provides evidence of compliance during inspections.

  7. Training and Certification: Personnel responsible for the maintenance and validation of laminar air flow systems should be properly trained and certified. This ensures that they have the necessary knowledge and skills to carry out these tasks effectively and safely.

Remember to always refer to the manufacturer's recommendations and guidelines specific to the laminar air flow system in use. Regular maintenance and validation are essential to ensure a controlled and contamination-free environment.


Laminar Air Flow: Everything You Should Know

All You Should Know About Laminar Airflow Cabinets in India


How to Effectively Use the Water Bath in the Laboratory for Optimal Results?

  A shaking water bath is used for mixing and agitating samples in a water bath under controlled temperature. Compared to other types of ...